

Hi folks,
Had my 997.2 C2S for a little over a week now and finally got around to starting the detailing work.
The weather has been miserable here in the Midlands for the last few days but today I thought I'd crack on regardless.
I had forgotten from my Boxster ownership days just how much brake dust OEM Porsche pads shed. 300 miles after picking her up and the alloys were covered in it. The insides of the wheels where not up to my OCD'ness so I went ahead and removed all wheels to clean them throughout. Hose down, spritz of wheel cleaner of choice, agitate with brush, hose down, spritz IronX and agitate with brush/let it work its magic for a couple of mins, hose down, microfiber cloth & Autoglym Intensive Tar Remover to scrub off the tar spots, hose down. Then dry and apply Poorboys Wheel Sealant with a foam applicator; let it cure buff off and re-apply another coat before buffing after it's dried.
The fronts wheel bolts were on far too tight (full OPC history including them provisioning tyres for which I have the prior owner's invoice). Took a lot of umph to remove. I also had to resort to the trusty old kettle and differential thermal expansion to get the wheels off the hub, they were stuck on good and proper. Torque'd up back on to the pukka 96 ft.lbs, which is not very much at all when you have a decent couple of feet of leverage.
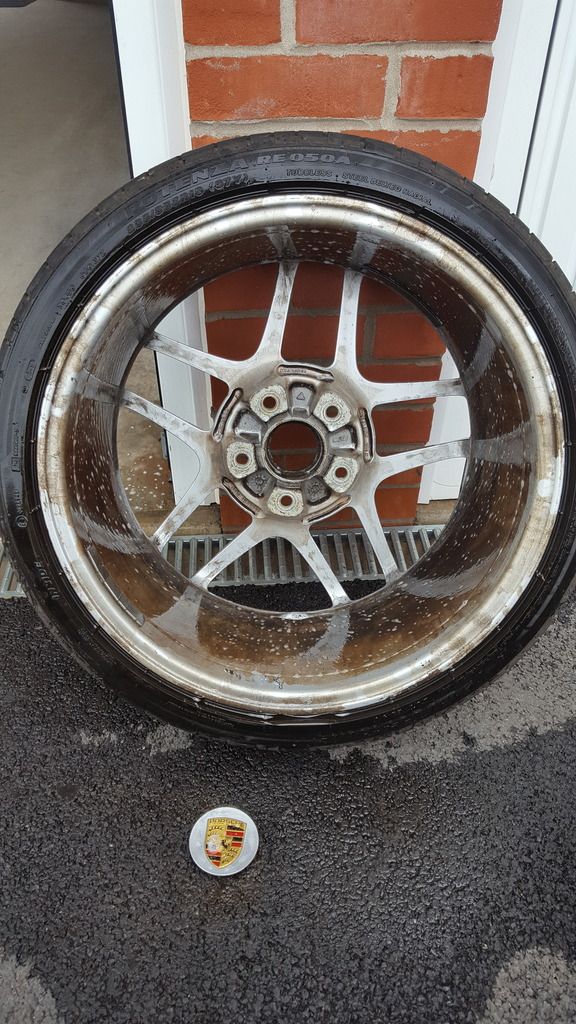
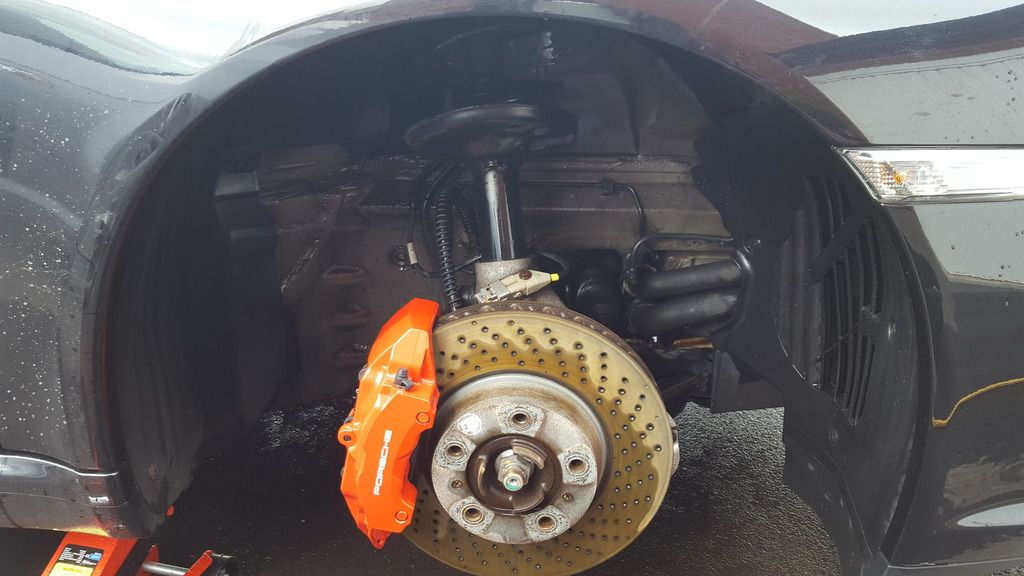
Inside of a front wheel:
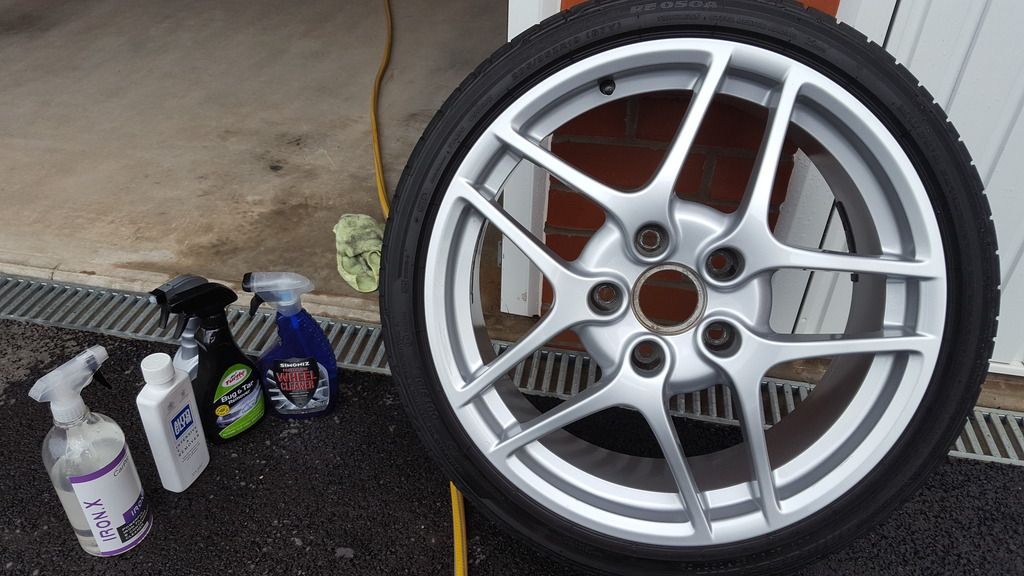
Token front shot:
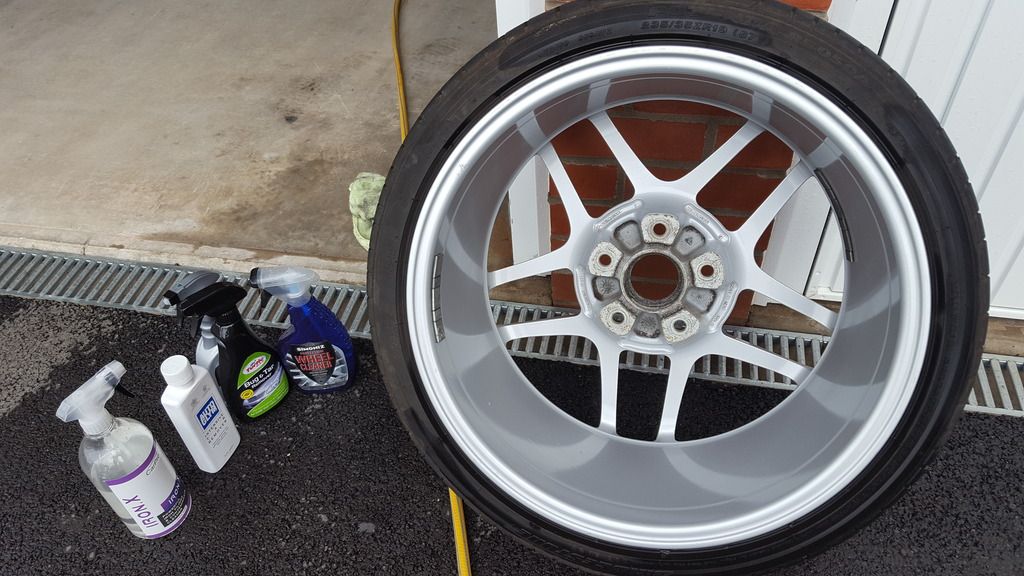
And the inside, AutoGlym Intensive Tar Remover is great stuff:
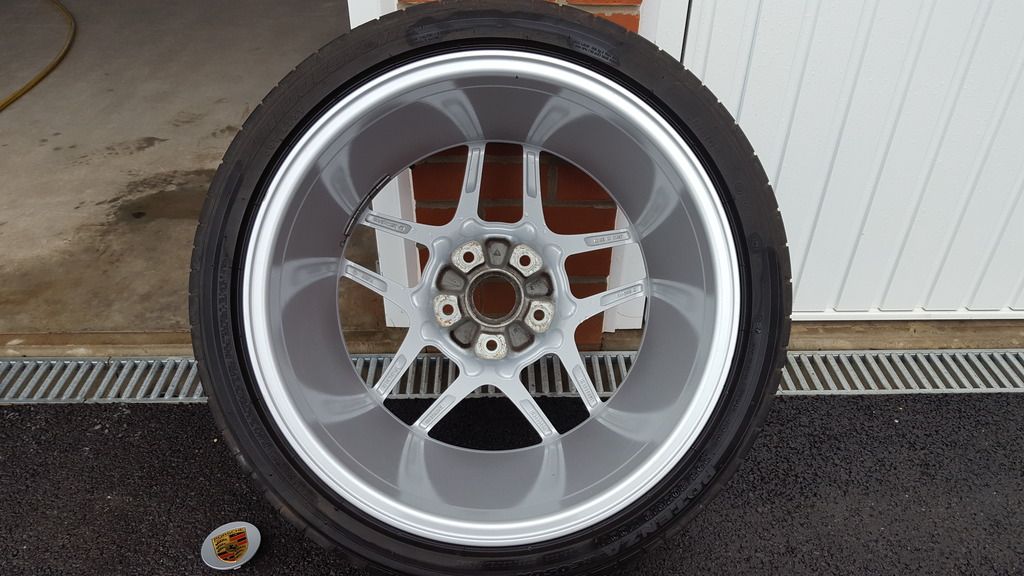
Rear Wheel after cleaning:
After each wheel was done, the bolts were treated to some Dremmel & wire brush to clean off the rust. I have some Autoglym Silver Alloy Paint to put on them but will do that a couple at a time when the weather is a bit warmer.
Then the wheel arches were attacked with pressure washer, APC 50% diluted and agitated with brush. Caliper was worked with wheel cleaner, Iron X and de-tar'd, agitating each product with a brush. Crappy picture, amazing how the phone camera makes the red caliper come out orange!
When I moved onto the rear arches whilst cleaning them I noticed something that sent alarm bells ringing and reminded me of my E46 M3 ownership time. You may or may not be aware that the metal work on the rear wings is rolled up into the arch and the U-channel that is formed is left exposed. When I was cleaning mine it reminded me of the issue that causes wings to rust on E46 M3's, where this u-channel fills with dirt and grime and traps moisture, leading to the inside of the sill to be wet/in contact with moisture for prolonged periods. On M3's this actually has caused many cars to rust, we talked about it at length on M3cutters, some previous owners may recall this. I don't know if this has been talked about on here (probably!) but I thought I'd mention it as a little preventative maintenance can make sure you don't have the same trouble.
On the upper part of the rear arch there is no plastic liner, said channel is fully exposed and my car (26k miles garage queen) was completely blocked with dirt and grime. The day was getting on so I ran out of time to do both sides properly by removing the wheel arch plastic liners completely, but I did clean them out best I could with my fingers/brush/hose. If you point the hose back at yourself up in the arch you'll see muddy coloured water run down as you poke at it to dislodge dirt. I'll do this properly in a few days by removing all the liners to gain good access and document it with some pics, but for now I thought I'd point this out in case it hadn't been mentioned before.
I'll note the front arches do have a liner all around which will help protect from this to some extent as it covers up said u-channel, but the rears are exposed from say 10 to 2 o'clock as you look at it. Maybe this rust issue is not something that's seen so much on our cars since many of us just use them as weekend cars and leave them in the garage, but spending some time cleaning the u-channels in your arches out will go a long way to making sure there's many trouble free years ahead (at least on the body work front!).
I ran a mile up and down the road to dry off the discs afterwards (remember to do this whenever you get them wet as it's a one way ticket to corroded discs for cars that have little use!) and upon my return was greeted with rusty water spots on the inside of my clean and shinny wheels (despite blowing them out with compressed air!), so be sure to check if you do this and wipe them clean again.
One question that cropped up whilst doing all this, my calipers are in great shape but there are a couple of places where they are chipped. Does Porsche sell touch up paint for these (bearing in mind it would have to be high temp paint)? If not, has anybody had a go at touching them up and has good experience with colour match with a particular source of paint?
Thanks!!
Had my 997.2 C2S for a little over a week now and finally got around to starting the detailing work.
The weather has been miserable here in the Midlands for the last few days but today I thought I'd crack on regardless.
I had forgotten from my Boxster ownership days just how much brake dust OEM Porsche pads shed. 300 miles after picking her up and the alloys were covered in it. The insides of the wheels where not up to my OCD'ness so I went ahead and removed all wheels to clean them throughout. Hose down, spritz of wheel cleaner of choice, agitate with brush, hose down, spritz IronX and agitate with brush/let it work its magic for a couple of mins, hose down, microfiber cloth & Autoglym Intensive Tar Remover to scrub off the tar spots, hose down. Then dry and apply Poorboys Wheel Sealant with a foam applicator; let it cure buff off and re-apply another coat before buffing after it's dried.
The fronts wheel bolts were on far too tight (full OPC history including them provisioning tyres for which I have the prior owner's invoice). Took a lot of umph to remove. I also had to resort to the trusty old kettle and differential thermal expansion to get the wheels off the hub, they were stuck on good and proper. Torque'd up back on to the pukka 96 ft.lbs, which is not very much at all when you have a decent couple of feet of leverage.
Inside of a front wheel:

Token front shot:

And the inside, AutoGlym Intensive Tar Remover is great stuff:

Rear Wheel after cleaning:

After each wheel was done, the bolts were treated to some Dremmel & wire brush to clean off the rust. I have some Autoglym Silver Alloy Paint to put on them but will do that a couple at a time when the weather is a bit warmer.
Then the wheel arches were attacked with pressure washer, APC 50% diluted and agitated with brush. Caliper was worked with wheel cleaner, Iron X and de-tar'd, agitating each product with a brush. Crappy picture, amazing how the phone camera makes the red caliper come out orange!

When I moved onto the rear arches whilst cleaning them I noticed something that sent alarm bells ringing and reminded me of my E46 M3 ownership time. You may or may not be aware that the metal work on the rear wings is rolled up into the arch and the U-channel that is formed is left exposed. When I was cleaning mine it reminded me of the issue that causes wings to rust on E46 M3's, where this u-channel fills with dirt and grime and traps moisture, leading to the inside of the sill to be wet/in contact with moisture for prolonged periods. On M3's this actually has caused many cars to rust, we talked about it at length on M3cutters, some previous owners may recall this. I don't know if this has been talked about on here (probably!) but I thought I'd mention it as a little preventative maintenance can make sure you don't have the same trouble.
On the upper part of the rear arch there is no plastic liner, said channel is fully exposed and my car (26k miles garage queen) was completely blocked with dirt and grime. The day was getting on so I ran out of time to do both sides properly by removing the wheel arch plastic liners completely, but I did clean them out best I could with my fingers/brush/hose. If you point the hose back at yourself up in the arch you'll see muddy coloured water run down as you poke at it to dislodge dirt. I'll do this properly in a few days by removing all the liners to gain good access and document it with some pics, but for now I thought I'd point this out in case it hadn't been mentioned before.
I'll note the front arches do have a liner all around which will help protect from this to some extent as it covers up said u-channel, but the rears are exposed from say 10 to 2 o'clock as you look at it. Maybe this rust issue is not something that's seen so much on our cars since many of us just use them as weekend cars and leave them in the garage, but spending some time cleaning the u-channels in your arches out will go a long way to making sure there's many trouble free years ahead (at least on the body work front!).
I ran a mile up and down the road to dry off the discs afterwards (remember to do this whenever you get them wet as it's a one way ticket to corroded discs for cars that have little use!) and upon my return was greeted with rusty water spots on the inside of my clean and shinny wheels (despite blowing them out with compressed air!), so be sure to check if you do this and wipe them clean again.
One question that cropped up whilst doing all this, my calipers are in great shape but there are a couple of places where they are chipped. Does Porsche sell touch up paint for these (bearing in mind it would have to be high temp paint)? If not, has anybody had a go at touching them up and has good experience with colour match with a particular source of paint?
Thanks!!
")


")


