Porsche 911 UK Enthusiasts Online Community Discussion Forum GB

Welcome to the @Porsche911UK website. Register a free account today to become a member! Sign up is quick and easy, then you can view, participate in topics and posts across the site that covers all things Porsche.

Already registered and looking to recovery your account, select 'login in' and then the 'forget your password' option.

The girl's getting a birthday treat.....

systemmeister

Spa-Francorchamps
Joined
25 Jun 2014
Messages
324
Have had the 996 about a year now and have treated her to some remedial bodywork, full new genuine shocks, springs, roll bars and top mounts all round.
She's been treated gently since, with scarce few miles extra under her belt.
I've promised to get the mechanical engine and transmission work done over winter but waited for the right time.

Anyway, the time is here to get cracking.

Bought her some new silencers courtesy of Milltek in shiny stainless - but this will be the icing on the cake.

The work planned;
* Clutch
* Vario Cam solenoid (one or both)
* Rear main seal (engine)
* IMS bearing
* Air/oil separator
* Cam cover seals
* Spark tubes and O-rings
* Oil change - lots of lovely Mobil 1.

I'm doing the donkey work myself, with assistance for the tricky bits by a very skilled engineer who works on these all day every day :)

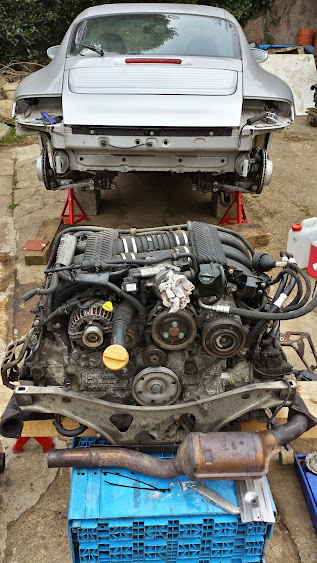
Photos tell the story so far......

14590001.JPG


15000005.JPG


15480002.JPG


15480003.JPG


16530001.JPG


16530002.JPG


17530001.JPG


17540001.JPG


17540002.JPG


17540004.JPG


15430001.JPG


15430004.JPG


15430007.JPG


16440001.JPG


17320001.JPG


17330004.JPG


18090003.JPG


18550002.JPG


20010001.JPG


20010003.JPG


20020004.JPG


20020005.JPG


20020006.JPG


20030008.JPG


20100001.JPG


20100003.JPG


20200003.JPG


Engine removal at the weekend.......
 
Great job! Just proves there is nothing 'special' about these cars, they are infact, just cars! Top work, wish more people were like this. :D :)
 
:thumbs: :popcorn: :yeah:
 
Looking forward to the next chapter!! Great work and woodwork too :thumb:
 
:mechanic: :thumb:

That exhaust looks HUUUUUUGE :sad:

Great thread
 
Excellent thread, great pics. That's a big filter there must be a risk of children and small animals being sucked off the pavement as you drive by :lol:
 
Cheers for the feedback.

The golden rule of working under cars is to have redundancy built into any support system.
the oak sleeper is not touching the car but would brace the weight if it fell off the axle stands / jacks.

Pics are courtesy of my go-pro copy (best of the non-brand type) SJCam in still mode. 75 quid or less.
Full HD video and 12MP still mode. The lens is semi-fisheye but its really useful for this kind of work.

I'm just collecting prices for ims options, and best prices for cam solenoids which i cant seem to find anywhere but opc.

Please chip-in if you know of anywhere i can source at better than opc prices?
 
Got back on with the work in hand and prepared for the removal of the engine.

According to various great online guides, especially "Pelican Parts" tech guides in the US.

So, to summarise, the coolant system was drained via the two main hoses on the rear of the engine, and also removed these hoses, along with the coolant tank hose, and the heater matrix feeds (smaller hoses) to the front of the engine.
I have recovered all the coolant for re-use, as I replaced it all when I first got the car and put to new rads on it.

I had already had the aircon de-gassed, so disconnected the hoses at the joints to the right of the engine bay.
The main battery lead also disconnected at the terminal post, and pushed aside (battery already disconnected of course) - same with the earth lead at the offside chassis leg beside the wheel well.
The multi-plug engine connectors are twistlock and easily unhooked.

To access the power steering hose connectors, the engine needs dropping 10-15cm. These are undone using spanners on the fittings which are annoyingly same size on each fitting (so you need two open-end spanners of same size in your kit).

The fuel supply/return lines are also better accessed at this point - undone and set aside.
Throttle cable is one of the last items to disconnect. I unhooked it from the throttle butterfly quadrant....there may be other options.


14220001.JPG


14220002.JPG


14220003.JPG


14220004.JPG


Nuts/studs holding nearside cat-to-manifold flange had corroded and disappeared....it literally was falling off.
Annoyingly the offisde was stubborn and the nuts had turned round due to corrosion - so i cut the two accessible studs off and undid the non accessible nut with a chisel....however the flange is stuck fast.
It'll be staying whilst I remove the engine.

16440004.JPG


16440002.JPG


16440001.JPG


17290003.JPG


17290002.JPG


17290001.JPG


17490003.JPG


17490002.JPG


17490001.JPG


18100004.JPG


18100003.JPG


18090002.JPG


18090001.JPG


18470007.JPG


18470006.JPG


18470005.JPG


18470004.JPG


And there is was...........GONE!

18470003.JPG
[/img]
 
:thumbs: :worship:
 
Bit more work today......degreasing and stripping ancillary bits off.......

20150321_160051_Richtone%28HDR%29.jpg


20150321_160027_Richtone%28HDR%29.jpg


21060001.JPG


21060003.JPG


21070004.JPG


18030005.JPG


18030004.JPG


18030003.JPG


18030002.JPG


Getting ready to do the crucial IMS and RMS now.....
 
what a hero. Do you need any specialist tools to do this? I'd love to think one day I'd be brave enough to take DIY to this level
 
21060001.JPG


millennium-falcon.GIF


:lol:
 

New Threads

Forum statistics

Threads
124,563
Messages
1,441,541
Members
48,978
Latest member
Timjar
Back
Top