Porsche 911 UK Enthusiasts Online Community Discussion Forum GB
Welcome to the @Porsche911UK website. Register a free account today to become a member! Sign up is quick and easy, then you can view, participate in topics and posts across the site that covers all things Porsche.
Already registered and looking to recovery your account, select 'login in' and then the 'forget your password' option.
You are using an out of date browser. It may not display this or other websites correctly.
You should upgrade or use an alternative browser.
You should upgrade or use an alternative browser.
2001 C4 project car
- Thread starter MisterCorn
- Start date
MisterCorn
Fuji
- Joined
- 8 Jan 2011
- Messages
- 9,410
Martin996RSR said:There is plenty of metal both fore and aft of the strut top mounting points, a strut brace would be putting a hat on a hat.
The flex in the 996 chassis comes from a lack of rigidity between the A and B pillars. You can solve for that with a cage that ties into more than just the floor, i.e. somewhere on both the A and B pillars too.
The cage that I am using is the safety devices on, it ties on to the rear suspension mounts and the floor at the front of the seats, as well as the floor at the front of the car. I will look to see what can be done to tie it in to the two pillars when I get to that points. Thanks for the tip
I have decided to copy what Richard did on his CLR project and remove the sound insulation from the rear of the car and cover the rear shelf in alcantara. First job is to remove the insulation. I've read a few ways of doing this, either heating it up or cooling it down. It sounds like the heating method produces a right mess so I decided to attack it with some circuit freezer spray and a strong trim removal tool and mallet. I got about this far in a little over 10 minutes but now need more spray.

MC
MisterCorn
Fuji
- Joined
- 8 Jan 2011
- Messages
- 9,410
MisterCorn
Fuji
- Joined
- 8 Jan 2011
- Messages
- 9,410
Here is a quick note on the brakes. Standard brakes for Carrera 4 996 are as follows.
Front disk, 318mm diameter, effective diameter 261.8mm
Rear disk, 299mm diameter, effective diameter 247.6mm
Front calipers use 36 and 40mm pistons. Area 2275mm^2
Rear calipers use 28 and 30mm pistons. Area 1323mm^2
Multiplying piston area by effective diameter gives the following forces and ratios.
Front. 2275x261.8 = 585595
Rear. 1323x247.6 = 327575
Front to back ratio of 1.82:1
New brakes are Cayenne turbo front calipers, 996 turbo rear calipers. 997 GT3 disks front and rear. Turbo calipers are required for the thicker disk for the GT3. Scaling up from the standard ones as I couldn't find figures for effective diameters gives.
Front disk, 350mm diameter, effective diameter 288mm
Rear disk, 350mm diameter, effective diameter 290mm
Front calipers use 30,34,40mm pistons. Area 2749mm^2
Rear calipers use 28 and 30mm pistons. Area 1323mm^2
Front. 2749x288 = 791712
Rear. 1323x290 = 383670
Front to back ratio of 2.06:1
So the new brakes have a slightly higher front bias.
Ratio of piston areas on new to old is 1.13:1
Old master cylinder is 23.81mm, new is 27mm. So 1.28x more area.
The new master cylinder will push more fluid than is needed.
The GT3 6 piston calipers uses smaller pistons at 28,32,34mm. Using these on the front would have given a more rearward brake bias of 1.75:1
There is a presure reducing valve fitted to the rear which there might be some leeway for tweaking or fitting different version from another car, but I haven't investigated yet. I will see how the slightly increased front bias affects the car first.
MC
MisterCorn
Fuji
- Joined
- 8 Jan 2011
- Messages
- 9,410
Tha caliper bodies are basically the same size as the 996 GT3 mk2 ones I have on my turbo. They are as big as will fit in an 18" wheel.
'Look at the brakes on that 911, they look too big' Said nobody, ever :grin:
MC
'Look at the brakes on that 911, they look too big' Said nobody, ever :grin:
MC
infrasilver
Moderator
- Joined
- 4 Oct 2010
- Messages
- 9,933
I had an hour long tour of MC's project today and its all very impressive seeing firsthand what has been done so far and what the plans are for it, there is still a long way to go though but it will look very very good once completed.
I especially like the brake set up and it is a pity you will never see that suspension set up once the car is on the deck.
I especially like the brake set up and it is a pity you will never see that suspension set up once the car is on the deck.
MisterCorn
Fuji
- Joined
- 8 Jan 2011
- Messages
- 9,410
Dammit said:Surely that depends on whether he gets a bit carried away with his hole-saw?
That was the scariest thing I have done in a long time. The sense of relief when it all worked out great was just superb. The only body parts available from Porsche are a 'front end'. Pretty much everything else I have done is easily reversible.
MC
MisterCorn
Fuji
- Joined
- 8 Jan 2011
- Messages
- 9,410
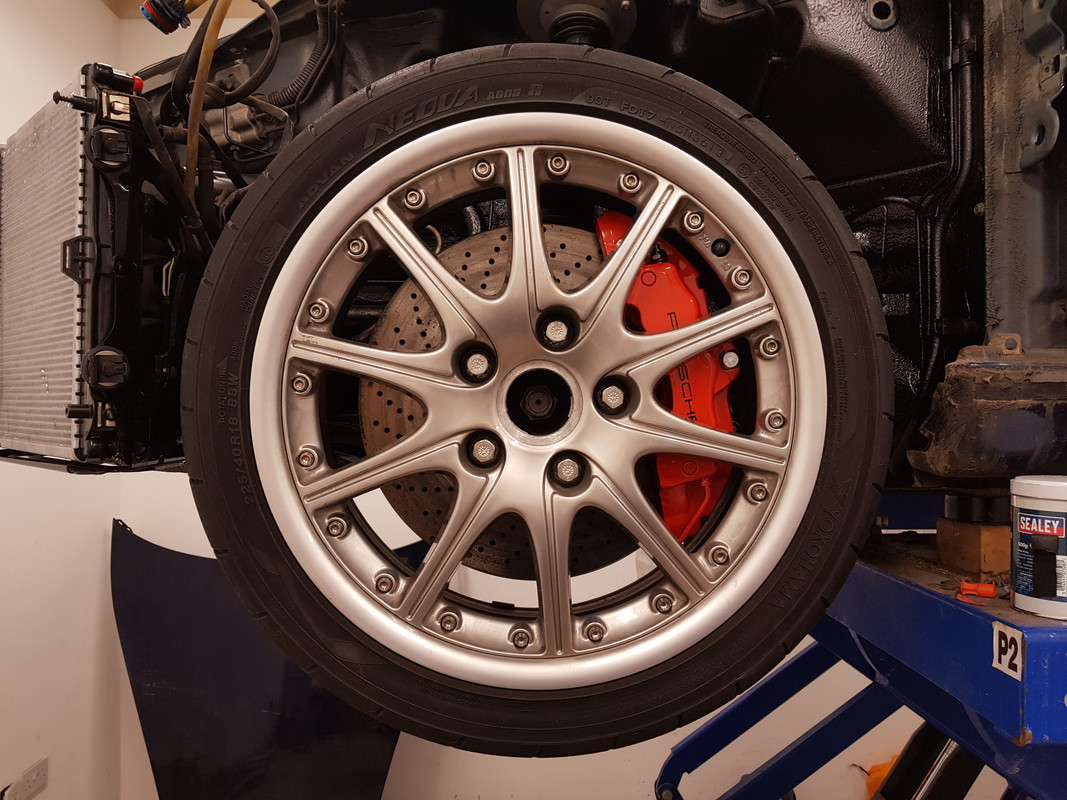
Checking clearance of the brakes with the wheels on. I previously tried 5mm spacers before they were on the car and it looked tight, this is the first time I have had the callipers and wheels properly bolted on to the car to check them. This is now running 7mm spacers. There is decent clearance all the way around, more than on my turbo.


A custom pipe is required to go the brake bracket on the back of the hub. This connects to new HEL lines. As the line was fitted to the car it didn't fall naturally in to place so had to have a 90 degree twist applied on both sides to get it to line up properly which I'm not 100% happy about. It does have decent movement on to fully look both ways though. Thoughts?


MC


A custom pipe is required to go the brake bracket on the back of the hub. This connects to new HEL lines. As the line was fitted to the car it didn't fall naturally in to place so had to have a 90 degree twist applied on both sides to get it to line up properly which I'm not 100% happy about. It does have decent movement on to fully look both ways though. Thoughts?


MC
New997buyer
Fuji
- Joined
- 17 Oct 2010
- Messages
- 9,146
infrasilver said:I had an hour long tour of MC's project today and its all very impressive seeing firsthand what has been done so far and what the plans are for it, there is still a long way to go though but it will look very very good once completed.
I especially like the brake set up and it is a pity you will never see that suspension set up once the car is on the deck.
:envy:
The worksmanship looks incredible. I thought Richie's work could t be topped but this is up there with it. A real pleasure to follow. Great work Martin :thumbs:
MisterCorn
Fuji
- Joined
- 8 Jan 2011
- Messages
- 9,410
Thanks for the kind words New997Buyer.
The centre radiator is being controlled based on the return temperature of the coolant from the radiators. So it will only be turned on when the other two radiators can't cope by themselves. This done with a temperature sensor in the main line just before the thermostat. Shown here fitted to the old hose, alongside a new hose.

And here in a trial fit on the engine without clips.

This is then wired up to the lead which runs along the back of the engine bay up to the fuse box.


This goes through the grommet on the right hand side with the PSE actuation wire.

These will get taped up more neatly when the engine is out.
I'm going to run with the old hose for now and then swap to the new one when the engine is out. This will give me a chance to confirm correct operation and that the sensor positioning is all fine before I cut the new hose.
MC
The centre radiator is being controlled based on the return temperature of the coolant from the radiators. So it will only be turned on when the other two radiators can't cope by themselves. This done with a temperature sensor in the main line just before the thermostat. Shown here fitted to the old hose, alongside a new hose.

And here in a trial fit on the engine without clips.

This is then wired up to the lead which runs along the back of the engine bay up to the fuse box.


This goes through the grommet on the right hand side with the PSE actuation wire.

These will get taped up more neatly when the engine is out.
I'm going to run with the old hose for now and then swap to the new one when the engine is out. This will give me a chance to confirm correct operation and that the sensor positioning is all fine before I cut the new hose.
MC
MisterCorn
Fuji
- Joined
- 8 Jan 2011
- Messages
- 9,410
As the roof is coming off, the roof rails need to be removed. Lift these up from the front edge and carefully lift along the length to pull out the clips.

There are clips under here which are wedged in place. These can be unwedged using a pair of pliers to release them.


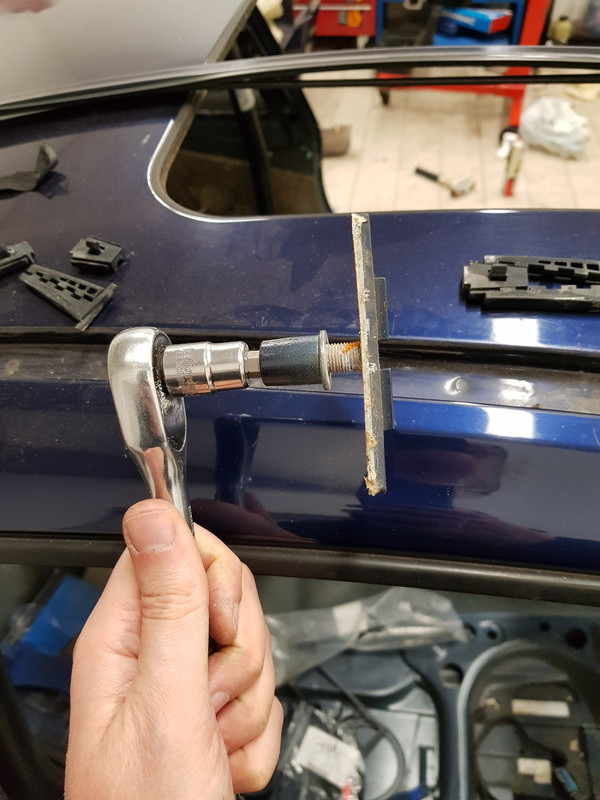
Near the front and the back are the rails on to which the roof transport system bolts. It isn't obvious how these fit, but with a pointer from ELA in the right direction there are nuts underneath which have an internal 6mm hex. Undo the nut, then remove the sealant along the inside edge to remove them.


That is then everything off the roof. On the inside of the strip are plastic clips which can be removed with a pointed tool to lever them out.


The roof is now ready for when the bodyshop drill out the spot welds to remove it.
MC

There are clips under here which are wedged in place. These can be unwedged using a pair of pliers to release them.


Near the front and the back are the rails on to which the roof transport system bolts. It isn't obvious how these fit, but with a pointer from ELA in the right direction there are nuts underneath which have an internal 6mm hex. Undo the nut, then remove the sealant along the inside edge to remove them.


That is then everything off the roof. On the inside of the strip are plastic clips which can be removed with a pointed tool to lever them out.


The roof is now ready for when the bodyshop drill out the spot welds to remove it.
MC
MisterCorn
Fuji
- Joined
- 8 Jan 2011
- Messages
- 9,410
The trim around the rear windows has been removed by drilling out the rivets. For most of them I have just taken the tops off for now, I'll remove the rest when I think I can get enough magnets and other stuff pushed in behind them to catch the majority of the heads. I doubt I will get them all. Hopefully any I don't catch will make it down to the sill where they can be removed. There is not a lot of clearance for some of the rivets so a right angle drill attachment was required.


MC


MC
MisterCorn
Fuji
- Joined
- 8 Jan 2011
- Messages
- 9,410
Similar threads
- Replies
- 5
- Views
- 466
- Replies
- 8
- Views
- 1K
Latest posts
-
-
-
-
PCM 1: Does my radio and sat nav from a 2002 996 have any value
- Latest: Ghostrider78
-
-
New Threads
-
PCM 1: Does my radio and sat nav from a 2002 996 have any value
- Started by martin t
- Replies: 2
-
1/18 Porsche scale model collections
- Started by Maxie
- Replies: 1
-
997.1 GT3 rear spring part number?
- Started by jayessdoubleu
- Replies: 2
-
For Sale Mobilube ptx 75w90- based near Loughborough- £11 a litre
- Started by Bigbaddog997
- Replies: 0
-
-
-
Porsche Model Range
Porsche 911
Porsche 992: 2018- Porsche 991: 2011-2019
 Porsche 997: 2004-2012
 Porsche 996: 1997-2005
 Porsche 993: 1993-1998
 Porsche 964: 1989-1993
 Porsche Carrera 3.2: 1983-1989
 Porsche Carrera SC: 1977-1983
 Porsche 930 Turbo: 1975-1989
 Porsche Early 911: 1964-1977

Porsche Hypercars
Porsche 918 Spyder Porsche Carrera GT
 Porsche GT1
 Porsche 959

Other Current Porsche Model
Porsche Taycan : (2019-0%) Porsche Macan : 2013-
 Porsche Panamera : 2009-
 Porsche Cayman: 2005-
 Porsche Cayenne: 2003-
 Porsche Boxster: 1997-

Porsche Legacy Models
Porsche 928 Porsche 968
 Porsche 944
 Porsche 924
 Porsche 914
 Porsche 912
 Porsche 904
 Porsche 550
 Porsche 356 Speedster
 Porsche 356


